
Lỗi sau khi cài đặt
Các lỗi sau khi bạn đã cài được macOS
Post-Install Issues
Issues revolving around macOS once properly installed.
#Broken iMessage and Siri
Refer to Fixing iServices (opens new window)section
#No on-board audio
Refer to Fixing Audio with AppleALC (opens new window)section
#BIOS reset or sent into Safemode after reboot/shutdown
Refer to Fixing RTC/CMOS Resets (opens new window)section
#Synaptics PS2 based trackpad doesn't work
You can try to use SSDT-Enable_DynamicEWMode.dsl (opens new window). First, you have to open Device Manager, and head to the following:
Device Manager -> Mice and other pointing devices -> Double click on your trackpad -> Properties -> Details > BIOS device nameThen grab SSDT-Enable_DynamicEWMode.dsl (opens new window)By default, this uses PCI0.LPCB.PS2K for the pathing. you'll want to rename accordingly.
External (_SB_.PCI0.LPCB.PS2K, DeviceObj) <- Rename this

    Name(_SB.PCI0.LPCB.PS2K.RMCF, Package()  <- Rename this
Then compile with MaciASL, copy to your OC/ACPI folder, and add it to your config, and you should be good to go.
Note: Although this will work for most cases, the trackpad may be laggy and you may not be able to use the physical buttons (more details (opens new window)). If you can live without the trackpad, this may be better:
Find the ACPI path of your mouse (see above), then grab SSDT-DisableTrackpadProbe.dsl (opens new window). By default, this uses PCI0.LPCB.PS2K so you have to change that to your ACPI path if necessary:
External (_SB_.PCI0.LPCB.PS2K, DeviceObj) <- Rename this

Name(_SB.PCI0.LPCB.PS2K.RMCF, Package() <- Rename this#Fix for Dell breakless PS2 keyboard keys
For those with issues surrounding key presses not releasing(ie. pressing infinitely), you'll want to enable VoodooPS2's Dell profile.
First of all, you need to find the path to your ACPI keyboard object in the Device Manager:
Device Manager -> Keyboards -> Double click on your keyboard -> Properties -> Details > BIOS device nameAfter this, grab SSDT-KEY-DELL-WN09.dsl (opens new window)and change the ACPI path to the one found above as needed:
External (_SB_.PCI0.LPCB.PS2K, DeviceObj) <- Rename this

Method(_SB.PCI0.LPCB.PS2K._DSM, 4) <- Rename this#macOS GPU acceleration missing on AMD X570
Verify the following:
GPU is UEFI capable(GTX 7XX/2013+)
CSM is off in the BIOS
Forcing PCIe 3.0 link speed
#DRM Broken
Refer to Fixing DRM (opens new window)section
#"Memory Modules Misconfigured" on MacPro7,1
Follow guide listed here:
For those who simply want to disable the notification(not the error itself) is more than enough. For these users, we recommend installing RestrictEvents(opens new window)
#Apps crashing on AMD
Easy fix, buy Intel
So with AMD, whenever Apple calls CPU specific functions the app will either not work or outright crash. Here are some apps and their "fixes":
Adobe Products don't always work
Some fixes can be found here: Adobe Fixes(opens new window)
Do note these fixes just disables functionality, they're not really fixes
Virtual Machine running off of AppleHV's framework will not work(ie: Parallels 15, VMware)
VirtualBox works fine as it doesn't use AppleHV
VMware 10 and older can work as well
Parallels 13.1.0 and older are known to work as well
Docker broken
Docker toolbox is the only solution as it's based off of VirtualBox, many features are unavailable with this version
IDA Pro won't install
There's an Intel specific check in the installer, app itself is likely fine
15/16h CPU web pages crashing
Follow directions here after UPDATE 5: Fix web pages(opens new window)
#Sleep crashing on AMD
This is generally seen on AMD who use the chipset's USB controller, specifically for the Ryzen series and newer. The main way to tell if you're having issues with this is checking logs after either sleeping or waking:
In terminal:
log show --last 1d | grep -i "Wake reason"
Should result in something like this:
Sleep transition timed out after 180 seconds while calling power state change callbacks. Suspected bundle: com.apple.iokit.IOUSBHostFamily.You can double check which controller is XHC0 via IOReg and checking the Vendor ID(1022 for AMD chipset). The fix for this sleep issue is either:
Avoid the chipset USB all together(ideally set
_STA = 0x0to disable the controller outright with an SSDT)Correct the USBX power properties to what the controller expects
#AssetCache Content Caching unavailable in virtual machine
Errors such as:
$ sudo AssetCacheManagerUtil activate
AssetCacheManagerUtil[] Failed to activate content caching: Error Domain=ACSMErrorDomain Code=5 "virtual machine"...
arise due to VMM flag being exposed by sysctl.
Apply VmAssetCacheEnable (opens new window)kernel patch to disguise the flag and allow normal operation.
#Coffee Lake systems failing to wake
In macOS 10.15.4, there were some changes made to AGPM that can cause wake issues on Coffee Lake systems. Specifically displays hooked up to the iGPU would fail to wake. To resolve this:
Add
igfxonln=1to boot-argsMake sure you're using WhateverGreen v1.3.8 (opens new window)or newer
#No brightness control on Dual GPU laptops
In macOS 11.3, there were some changes made to backlight controlling mechanisms that defaults the backlight to be controlled by the dGPU on Dual GPU laptops with MUX enabled. Optimus only laptops, however, are not affected, since you need to disable the dGPU anyways. Specifically, this problem only causes issues if you have a Dual GPU laptop with the internal screen from an iGPU output and external screens from dGPU outputs (Hybrid Mode on some Mobile Workstations). To resolve this, you may disable either the iGPU or the dGPU, or do the following:
Verify SSDT-PNLF is installed(ie. EFI/OC/ACPI as well as config.plist -> ACPI -> Add)
Add below to
PciRoot(0x0)/Pci(0x2,0x0):
@0,backlight-control | Data | 01000000
applbkl | Data | 01000000
AAPL,backlight-control | Data | 01000000
AAPL00,backlight-control | Data | 01000000
Add below to your dGPU PCI address:
@0,backlight-control | Data | 00000000
applbkl | Data | 00000000
AAPL,backlight-control | Data | 00000000
#No temperature/fan sensor output
So couple things:
iStat Menus doesn't yet support MacPro7,1 readouts
VirtualSMC's bundled sensors do not support AMD
For iStat, you'll have to wait for an update. For AMD users, you can use either:
SMCAMDProcessor(opens new window)
Still in early beta but great work has been done, note it's been mainly tested on Ryzen
Note for AMD with FakeSMC:
FileVault support requires more work with FakeSMC
Make sure no other SMC kexts are present, specifically those from VirtualSMC(opens new window)
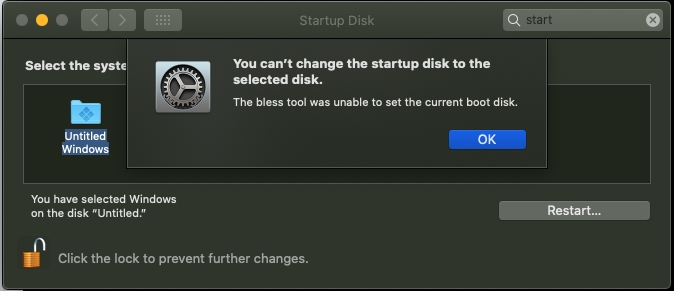
#"You can't change the startup disk to the selected disk" error
This is commonly caused by irregular partition setup of the Windows drive, specifically that the EFI is not the first partition. To fix this, we need to enable this quirk:
PlatformInfo -> Generic -> AdviseFeatures -> True
#Selecting Startup Disk doesn't apply correctly
If you're having issues with Startup Disk correctly applying your new boot entry, this is most likely caused by a missing DevicePathsSupported in your I/O Registry. To resolve this, ensure you are using PlatformInfo -> Automatic -> True
Example of missing DevicePathsSupported:
#macOS waking up with the wrong time
An odd quirk some people may notice is that from wake, macOS will have the incorrect time for a bit before self-correcting with network time check. The root cause of this issue is most likely due to your RTC not ticking, and can be resolved with a new CMOS battery(note that Z270 and newer are quite picky with voltage so choose carefully).
To verify whether your RTC is working correctly:
Download VirtualSMC v1.1.5+ (opens new window)and run the smcread tool:
/path/to/smcread -s | grep CLKT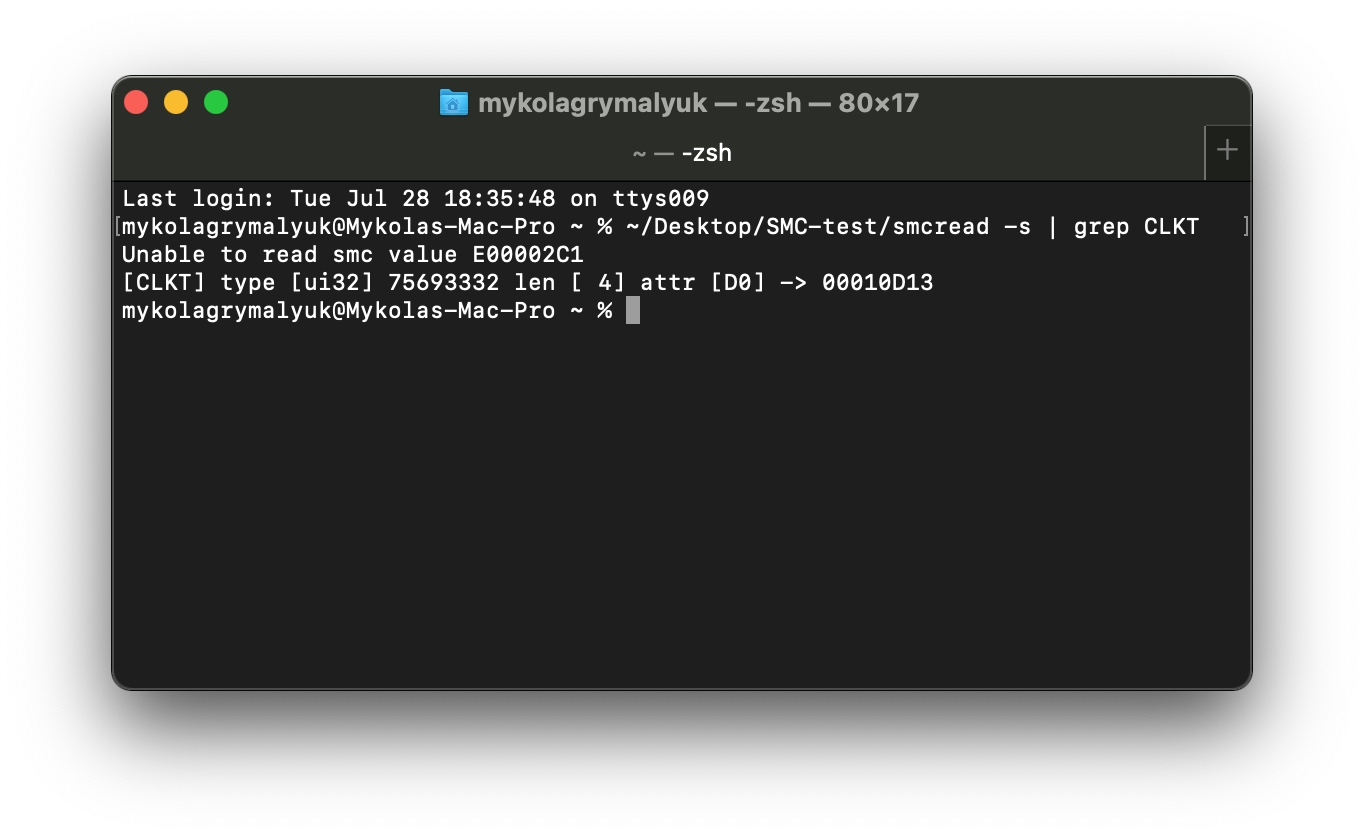
This should provide you with a hexadecimal value, and once converted it should equal time elapsed from Midnight relative to Cupertino.
So for this example, we'll grab our value(00010D13) then convert it to decimal and finally divide it by 3600. This should result in the approximate time elapsed(in seconds) since midnight relative to Cupertino
00010D13 (Convert to HEX)-> 68883 (Divided by 3600 so we get hours)-> 19.13h(so 19:07:48)
Next you'll want to put your hack to sleep for a bit and wake it, then check the CLKT value once more to see whether it deviated more or if it has a set difference. If you find it didn't actually tick much of at all from the elapsed time, you'll need to look into buying a new battery(with proper voltage)
#No Volume/Brightness control on external monitors
Oddly enough, macOS has locked down digital audio from having control. To bring back some functionality, the app MonitorControl (opens new window)has done great work on improving support in macOS
#Time inconsistency between macOS and Windows
This is due to macOS using Universal Time while Windows relies on Greenwich time, so you'll need to force one OS to a different way of measuring time. We highly recommend modifying Windows instead as it's far less destructive and painful:
#Disabling SIP
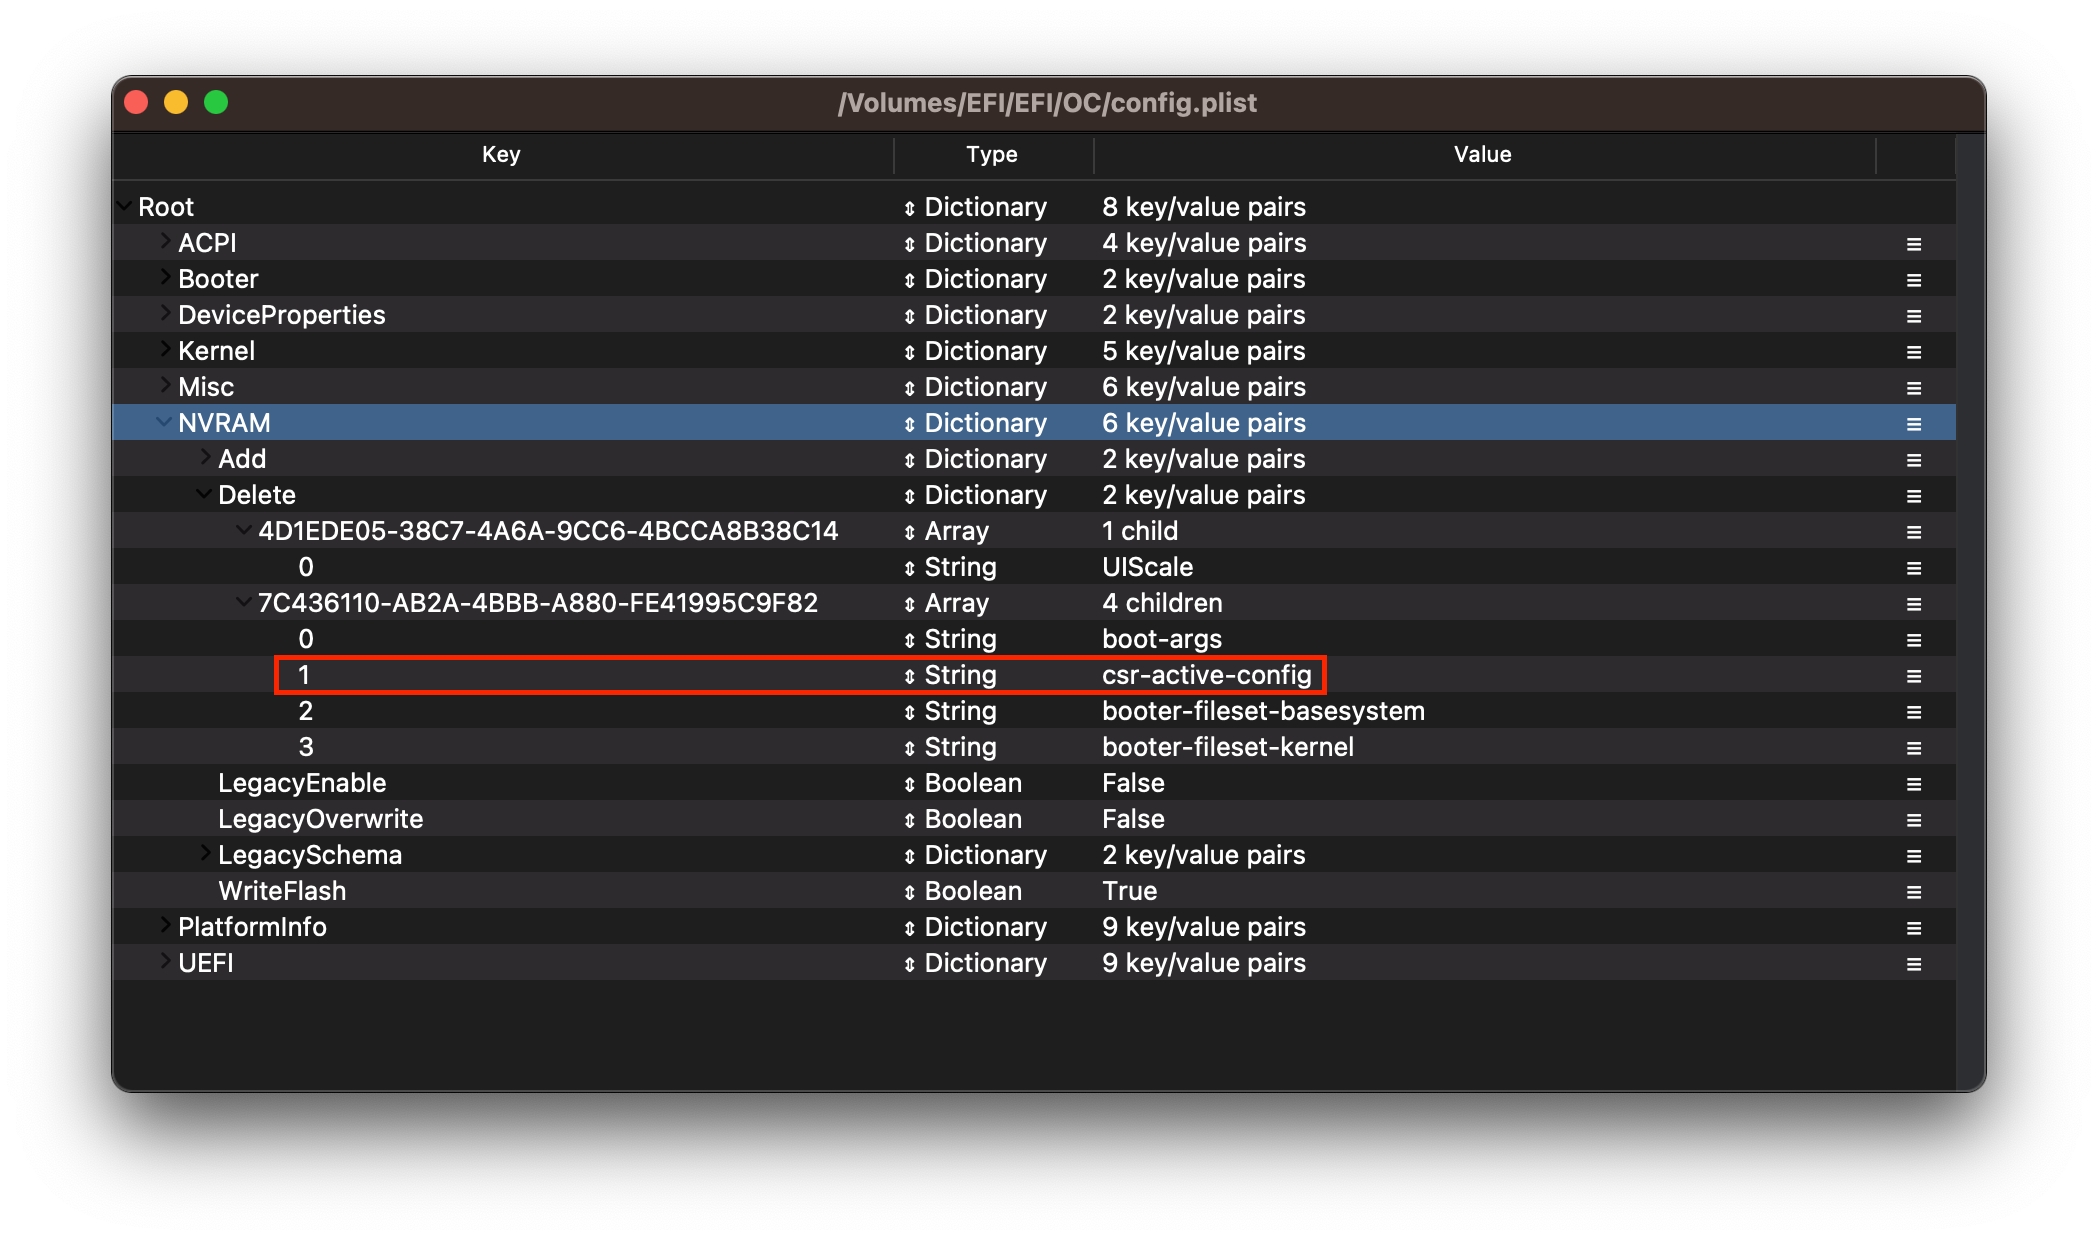
SIP or more properly known as System Integrity Protection, is a security technology that attempts to prevent any malicious software and the end user from damaging the OS. First introduced with OS X El Capitan, SIP has grown over time to control more and more things in macOS, including limiting edits to restricted file locations and 3rd party kext loading with kextload(OpenCore is unaffected as kexts are injected at boot). To resolve this, Apple has provided numerous configuration options in the NVRAM variable csr-active-config which can either be set in the macOS recovery environment or with OpenCore's NVRAM section(The latter will be discussed below).
WARNING: Disabling SIP can break OS functionality such as software updates in macOS 11, Big Sur and newer. Please be careful to only disable specific SIP values instead of disabling SIP outright to avoid these issues.
Enabling
CSR_ALLOW_UNAUTHENTICATED_ROOTandCSR_ALLOW_APPLE_INTERNALare common options that can break OS updates for users
You can choose different values to enable or disable certain flags of SIP. Some useful tools to help you with these are BitmaskDecode (opens new window)and csrstat (opens new window). Common values are as follows (bytes are pre-hex swapped for you, and note that they go under NVRAM -> Add -> 7C436110-AB2A-4BBB-A880-FE41995C9F82 -> csr-active-config):
00000000- SIP completely enabled (0x0).03000000- Disable kext signing (0x1) and filesystem protections (0x2).FF030000- Disable all flags in macOS High Sierra (opens new window)(0x3ff).FF070000- Disable all flags in macOS Mojave (opens new window)and in macOS Catalina (opens new window)(0x7ff) as Apple introduced a value for executable policy.FF0F0000- Disable all flags in macOS Big Sur (0xfff) which has another new flag for authenticated root (opens new window).
Note: Disabling SIP with OpenCore is quite a bit different compared to Clover, specifically that NVRAM variables will not be overwritten unless explicitly told so under the Delete section. So if you've already set SIP once either via OpenCore or in macOS, you must override the variable:
NVRAM -> Delete -> 7C436110-AB2A-4BBB-A880-FE41995C9F82 -> csr-active-config
#Writing to the macOS system partition
With macOS Catalina and newer, Apple split the OS and user data into 2 volumes where the system volume is read-only by default. To make these drives writable we'll need to do a few things:
Note: Users of
SecureBootModelmay end up in a RecoveryOS boot loop if the system partition has been modified. To resolve this, Reset NVRAM and setSecureBootModeltoDisabled
macOS Catalina
Mount drive as writable (Run
sudo mount -uw /in terminal)
macOS Big Sur
Mount drive as writable (See below link for command)
Note: Due to how OS updates work in macOS Big Sur and newer, changing the system volume can in fact break OS updates. Please edit with caution
Commands based off of Apple's KDK documents:
# First, create a mount point for your drive
mkdir ~/livemount
# Next, find your System volume
diskutil list
# From the below list, we can see our System volume is disk5s5
/dev/disk5 (synthesized):
#: TYPE NAME SIZE IDENTIFIER
0: APFS Container Scheme - +255.7 GB disk5
Physical Store disk4s2
1: APFS Volume Big Sur HD - Data 122.5 GB disk5s1
2: APFS Volume Preboot 309.4 MB disk5s2
3: APFS Volume Recovery 887.8 MB disk5s3
4: APFS Volume VM 1.1 MB disk5s4
5: APFS Volume Big Sur HD 16.2 GB disk5s5
6: APFS Snapshot com.apple.os.update-... 16.2 GB disk5s5s
# Mount the drive(ie. disk5s5)
sudo mount -o nobrowse -t apfs /dev/disk5s5 ~/livemount
# Now you can freely make any edits to the System volume
# If you edited either the S*/L*/Kernel, S*/L*/Extensions or L*/Extensions,
# you will need to rebuild the kernel cache
sudo kmutil install --volume-root ~/livemount --update-all
# Finally, once done editing the system volume we'll want to create a new snapshot
sudo bless --folder ~/livemount/System/Library/CoreServices --bootefi --create-snapshot#Rolling back APFS Snapshots
With macOS Big Sur, the system volume is now snapshotted allowing you to roll back in case of issues with system updates breaking due to a broken seal. Thanks to new snapshots being created with every OS update, we've got quite a bit to roll back too.
To roll back, you'll first need to reboot into Recovery partition then select "Restore From Time Machine Backup":

#Apple Watch Unlock issues
For those with Apple Watch Unlock issues, verify the following:
You have a supported Apple Wireless card with Bluetooth Low Energy(4.0+)
Your watch and Mac are signed in with the same account
iServices working correctly(ie. iMessage)
There's an option to Unlock with Apple Watch under Security and Privacy setting in System Preferences
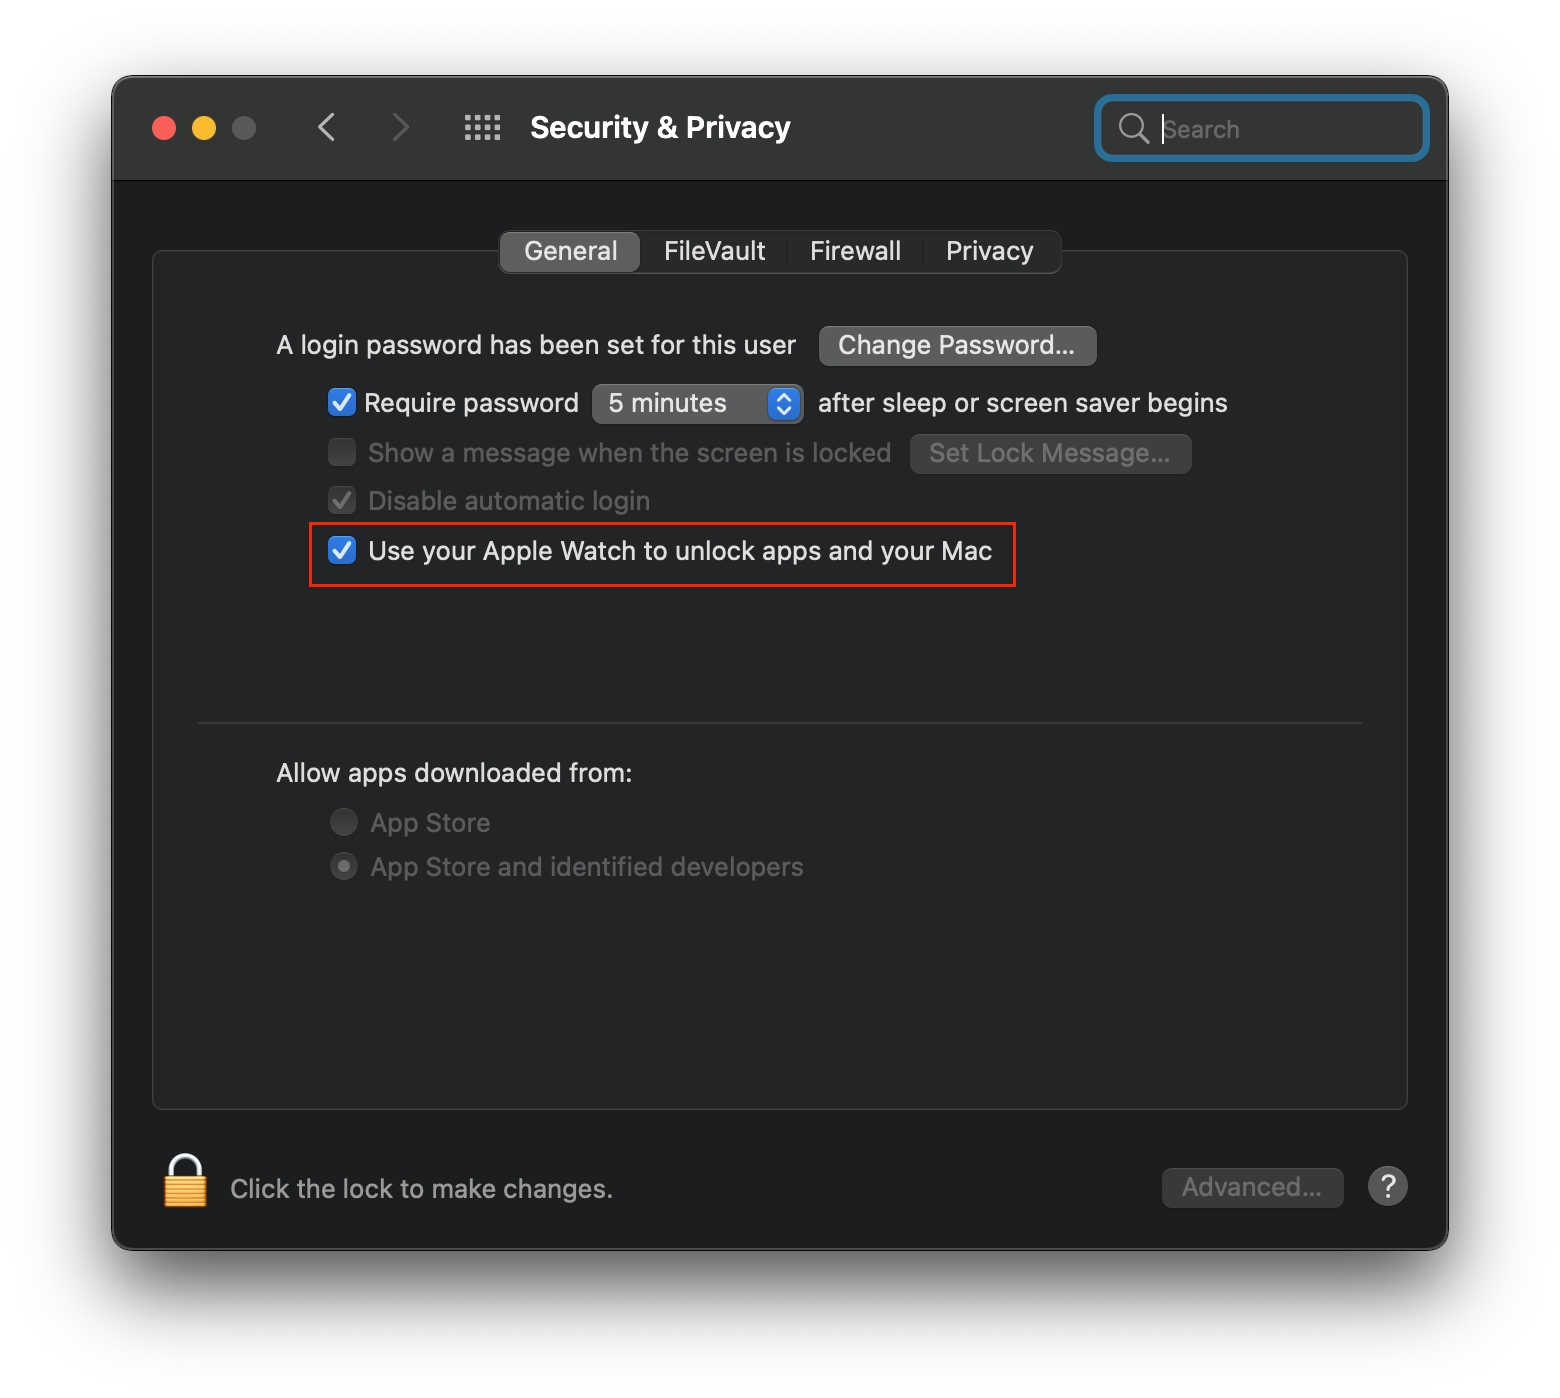
If the above are met, and you still have unlock issues we recommend running through the below guide:
#4K iGPU output issues over HDMI
For machines with HDMI 2.0 capable ports with resolution issues, verify the following:
4k output works correctly in Windows
Monitor is set explicitly to HDMI 2.0
If using an HDMI to DisplayPort converter, ensure the monitor is set to DisplayPort 1.2 or higher
Ensure enough iGPU memory has been allocated
For Broadwell and newer, 64MB is expected to be allocated
Machines relying on WhateverGreen's
framebuffer-stolenmemproperty should know this can cause 4k output issues. Please ensure you can set the iGPU's memory to 64MB allowing you to remove these properties
Laptops and many desktop users may need this boot-arg:
-cdfon
For all other troubleshooting, please reference WhateverGreen's Intel docs
Last updated